DECK FASCIA BOARD INSTALLATION WITH TOPLOC™ FASTENERS
Looking for guidance on how to install the deck fascia board to your composite deck? You’ve come to the right place.
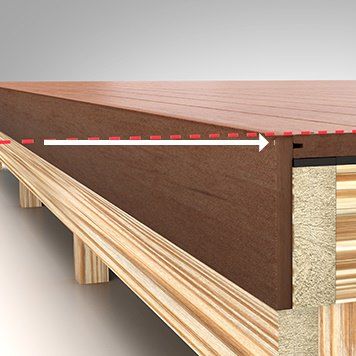
A DECK FASCIA BOARD is the board that runs around the perimeter of the deck for a seamless look. Fascia covers the wood perimeter joist of the deck frame and is sometimes called “rim joist cover.”
BEFORE YOU BEGIN, make sure you’ve properly blocked and spaced your deck joists and that your deck’s substructure is healthy. Please consult all appropriate installation guides.
What To Know Before You Build
Design Details
Instruction guidelines on how to properly install fascia for a polished aesthetic.
Fascia Details
The fascia boards will be installed flush with the deck boards to cover the ends.
TimberTech Fascia Installation Tips
Estimated based on a 12′ x 12′ deck; time will vary depending on the size of deck and complexity of the build.
ESTIMATED TIME: 1 Hour
RECOMMENDED MAN-POWER: 1-2 People
PREREQUISITES: Secured framing, properly attached to the house. A confirmed deck design. Deck boards installed correctly.
OVERVIEW
- Step 1: Choose the Right TOPLoc Fasteners for Your Build
- Step 2 – Option A: If you built with Advanced PVC Deck Boards, Install TimberTech Advanced PVC Fascia Boards.
- Step 2 – Option B: If you built with Composite Deck Boards, Install TimberTech Composite Fascia Boards.
TOOLS TO INSTALL
- Safety glasses.
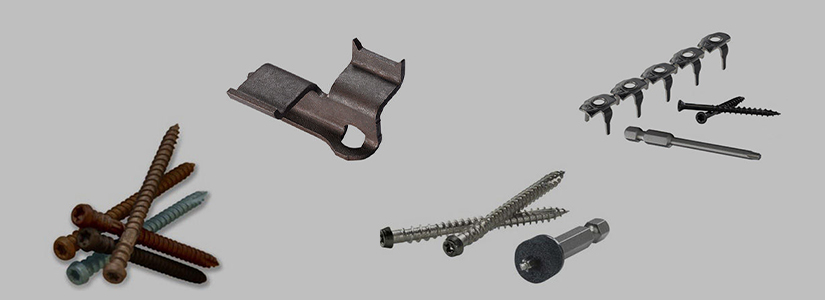
- TOPLoc color-matched fascia fasteners (see Step 1).
- Drill.
- T20 driver bit (included).
- Level.
- Tape Measure.
- Saw.
CHECK YOUR DECK
Do not move forward until you’ve confirmed your deck frame is structurally sound.
Step 1: Choose the Right TOPLoc Fasteners for Your Build
TimberTech composite decking products are highly durable and require the use of high-quality deck fasteners. For best deck fascia board results, use the TOPLoc fascia fastening product developed for the specific decking line you chose (capped polymer or capped composite). Both TOPLoc for Composite fascia fasteners and TOPLoc for Advanced PVC fascia fasteners are color-matched for a seamless look.

TOPLoc for Composite
Use TOPLoc for Composite hidden fascia fasteners and TOPLoc fascia drill bit (sold separately).

TOPLoc for Advanced PVC
Use TOPLoc for Advanced PVC hidden fascia fasteners and TOPLoc fascia drill bit (sold separately).
Step 2 – Option A: Install TimberTech Advanced PVC Fascia Boards
Note: If you built your deck using TimberTech Composite deck boards, skip to Step 2 – Option B.
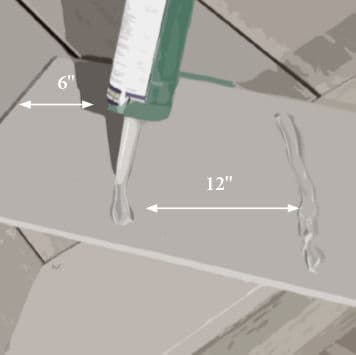
1. Apply Adhesive
Apply a good-quality exterior-grade construction adhesive to the back (smooth) surface of the board. Do not get adhesive on the grained surface of the rim joist or decking.
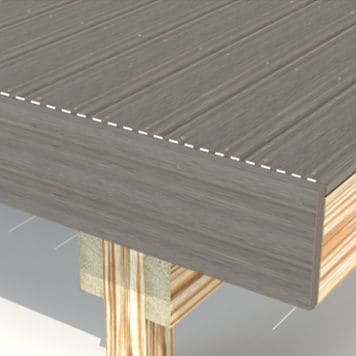
2. Position the Board
Position the board so it is flush with the top of the deck boards.
3. Fasten
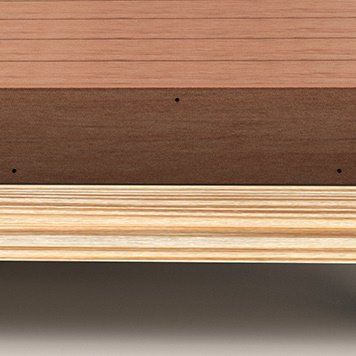
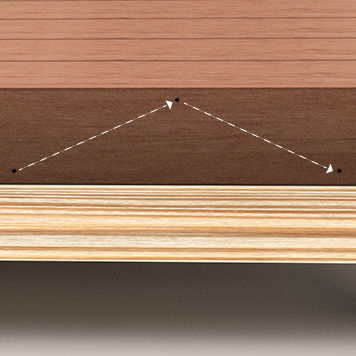
Install three fasteners from top to bottom, with top and bottom screws positioned no more than ½” from the end. The third screw should be approximately centered in the board. Repeat this configuration every 12”.
CAPPED POLYMER FASCIA FASTENING BEST PRACTICES

As You Install TimberTech Advanced PVC Fascia Boards
- Maintain no more than 12″ between fasteners as you apply the fascia boards.
- Each fastener must be in full contact with the edge of the fascia board, with the screw holding the fastener down tight to the board.

Position and Rip-Cut as Needed
- Measure the length of the outside rim joist to determine the length of Advanced PVC fascia board needed.
- It may be necessary to rip-cut the fascia board to fit the outside rim board of the deck. A slight overhang is permitted, the goal being to hide the wood rim joist.
Step 2 – Option B: Install TimberTech Composite Fascia Boards
Note: If you built your deck using TimberTech Composite deck boards, skip to Step 2 – Option B.
1. Position Your Board
Position the fascia board so it is flush with the top of the deck boards.
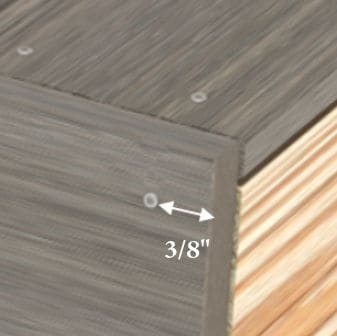
2. Pre-Drill
Pre-drill 2″ from the top and bottom, alternating between the two at a maximum of 12″. Do not drive fasteners into ends or edge of deck boards or splitting of deck board can occur.
3. Drive the Fasteners
Fasten in the pattern described above, working in one direction.
CAPPED COMPOSITE FASCIA FASTENING BEST PRACTICES

Ensure Proper Connection
- Each fastener must be in full contact with the edge of the fascia board, with the screw holding the fastener down tight to the board.
- Each fastener location must be pre-drilled with the TopLoc fascia drill bit.
- Install two fasteners at the beginning of the board, then alternate from top to bottom every 12″.
- Install two fasteners at the end of the board.
- Continue fastening in the pattern described above, working left to right or right to left. This will ensure flatness in the fascia.
Position and Rip-Cut as Needed
- Measure the length of the outside rim joist to determine the length. Ensure Proper Connection of Composite fascia board.
- It may be necessary to rip-cut the fascia board to fit the outside rim board of the deck. A slight overhang is permitted, with the goal being to hide the wood rim joist.
- If the fascia or rim board requires “ripping down,” make sure that the cut edge is positioned down, not up, which exposes the core material.
- Place factory edge / cap stock edge up and flush with the deck surface.
NOTE
The techniques shown should be used for best results. Results may vary, as expansion and contraction could still occur. AZEK Building Products Inc. claims no liability or responsibility for the improper installation of this product. Since all installations are unique, it is the sole responsibility of the installer to determine specific requirements in regard to each decking application. AZEK Building Products recommends that all designs be reviewed by a licensed architect, engineer or local building official before installation. Please contact AZEK Customer Service prior to installing if you have question or concerns.
DO NOT COMPLETELY TORQUE DOWN THE FASTENER
The screw should serve as a hanging mechanism to allow for expansion and contraction in the fascia.