Looking for guidance on how to install TimberTech Advanced PVC decking with Cortex hidden fasteners? You’ve come to the right place.
Looking for Color-Matched Fasteners, instead? If you prefer color-matched, top-down fasteners, install TimberTech Advanced PVC with TOPLoc.
Consult all appropriate installation guides before starting your project.
What To Know Before You Build
Substructure
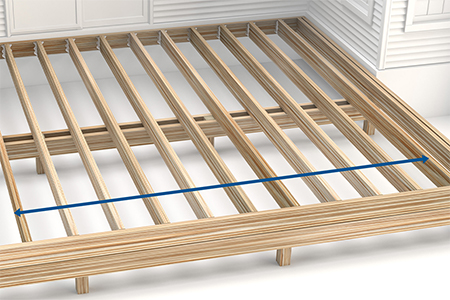
Make sure you’ve properly blocked and spaced your deck joists and that your deck’s substructure is healthy.
Material
Store decking in a cool, dry place and keep cool during attachment. Avoid full, direct sunlight to minimize risk of gapping.
Design
This guide assumes the use of square-shoulder 5.5″ deck boards and 1/8″ spacing in a straight, edge-to-edge pattern.
Railing
Install any railing on top of the deck boards after the decking is installed.
Your Project Needs the Right Fasteners
TimberTech Advanced PVC decking is compatible with hidden or color-matched fasteners. You’ll first choose your fastener, then match it to the coordinating board profile. Find the right fastener
Choosing Your TimberTech Advanced PVC Top-Down Fastener
TOPLoc for Advanced PVC
Color-matched fasteners.
- Compatible with all TimberTech Advanced PV decking.
- Screw heads painted to complement Advanced PVC decking colors.
- 305-grade stainless steel screws.
- ACQ-approved with a TORX® ttap® drive system for a wobble-free installation.
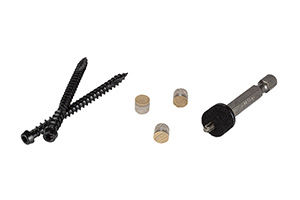
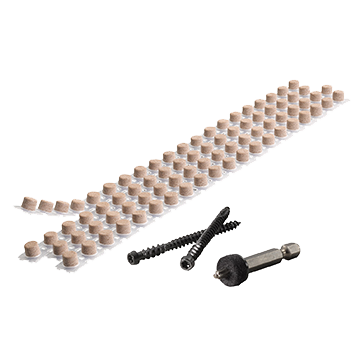
Advanced PVC Cortex
Hidden fasteners.
- Compatible with all TimberTech Advanced PVC capped polymer decking.
- Collated plugs with pre-aligned grain pattern.
- Can be used on the entire deck surface, including stairs and perimeters, where other hidden fasteners cannot.
- Features a high-quality, ACQ-approved, specialty deck screw with a TORX® ttap® drive system.
TimberTech Advanced PVC Decking Installation Tips
Estimated based on a 12′ x 12′ deck; time will vary depending on the size of deck and complexity of the build.
ESTIMATED TIME: 3.5 Hours
RECOMMENDED MAN-POWER: 1-2 People
PREREQUISITES: Secured framing, properly attached to the house. A confirmed deck design.
Overview
- Step 1: Use Best Practices for Cutting Advanced PVC Deck Boards
- Step 2: Use Best Practices for Fastening Advanced PVC Deck Boards
- Step 3: Confirm Your Spacing & Deck Size
- Step 4: Determine Where to Start Laying Boards
- Step 5: Install TimberTech Advanced PVC Decking
- Step 6: Prolong the Aesthetics of Your Deck
Tools You’ll Need
- Safety glasses
- Power miter saw
- Jig saw
- Cordless driver
- Measuring tape
- Deck spacer or spacing tool (optional)
- Advanced PVC Cortex Hidden Fastening System with collated or loose plugs
- Hard plastic, smooth-faced hammer
- Carpenter square
CHECK YOUR DECK
Do not move forward until you’ve confirmed your deck frame is structurally sound.
Step 1: Best Practices for Cutting Advanced PVC Deck Boards
For cutting TimberTech Advanced PVC deck boards, make sure to use an appropriate saw.
NOTE: Do not use cordless saws.
Cutting Tools
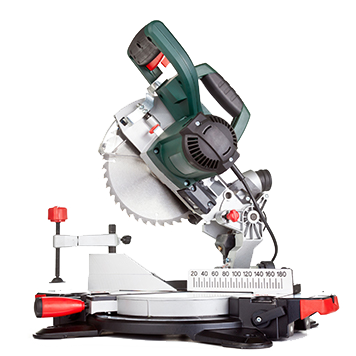
Sliding Power Miter Saw
BEST FOR CUTTING ADVANCED PVC BOARDS:
Use a miter saw with a fine-toothed, carbide-tipped finish trim blade (12” 100-tooth or 10” 90-tooth minimum).
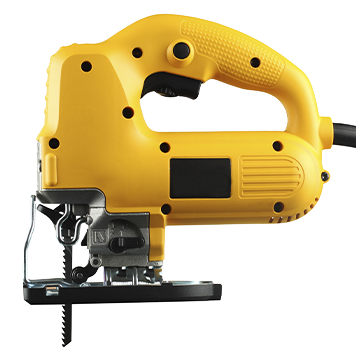
Jig Saw
FOR NOTCHING AROUND RAIL POSTS:
Use a fine-tooth finish blade.
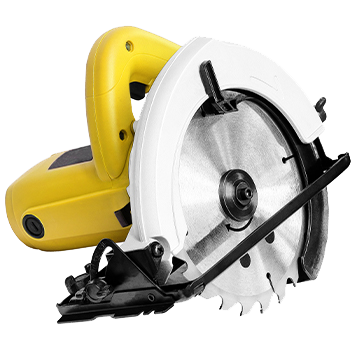
Electric Circular Saw
OTHER METHOD FOR CUTTING ADVANCED PVC BOARDS:
Use a minimum 60-tooth finish blade.
Cutting The Decking Boards
- Use proper saw and blade.
- Cut boards one at a time.
- Cut deck boards with the grain facing upward.
- While using any saw, use slow cuts or chipping can occur.
- Do not use battery-powered saws, as chipping can occur.
- As with any wood or alternative decking product, always be sure to cut the factory ends of your board for a clean and square finish.
- Make sure the face of the deck board is protected from the bottom of the saw during cutting with a circular saw or a jig saw.
- If using a circular saw, be sure to use a saw guide for clean, square cuts.
- For best results, cut boards before installing/ fastening or chipping can occur.
- As always, measure twice and cut once.
Fasten the deck boards as soon after cutting as possible. Do not leave boards unattached for long periods of time or overnight, as the board length will change with temperature changes.
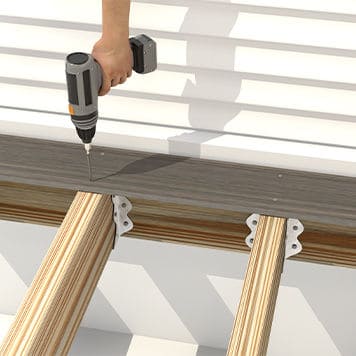
Step 2: Best Practices for Fastening Advanced PVC Deck Boards
Due to the high quality and long lifespan of TimberTech Advanced PVC deck products, we recommend a high-quality fastener for installation such as the following:
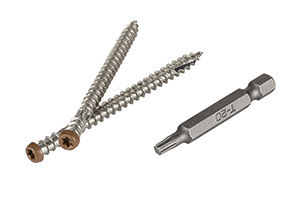
Cortex hidden fasteners with collated plugs and included setting tool.
As always, you should try the fastener in a sample board before beginning the process of installing TimberTech Advanced PVC decking with Cortex.
NOTE
TimberTech does not recommend any fastener that is not explicitly stated in the TimberTech Decking Installation Guide. Use of any alternative fastener does not void the TimberTech warranty; however, if a decking failure is caused by using one of these alternative fastening methods, any corresponding claims will be denied.
APPLICATION TIP
When fastening TimberTech Advanced PVC
decking with Cortex, NO PRE-DRILLING IS REQUIRED.
Fastening Tools

Cordless Drill
Cortex Hidden Fasteners
With plugs and included setting tool.
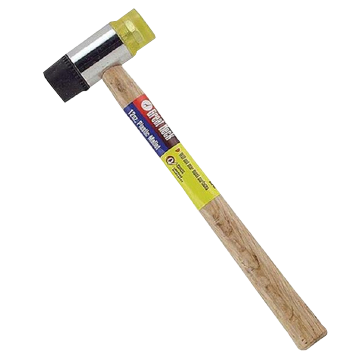
Plastic Hammer
NAIL THE PROJECT, NOT YOUR DECK
Do not use nails or adhesives to fasten TimberTech Advanced PVC deck boards.
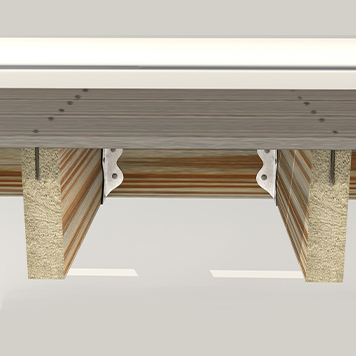
Capped Polymer Board Fastening Best Practices

Fastener Position
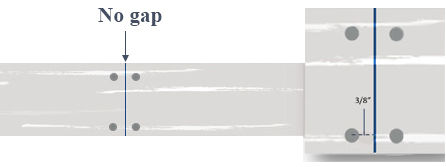
Fasten ¾” from a given side’s edge and within ½” (3/8″ recommended) from the end of the board (no pre-drilling required). Fasten all ends of boards, splices, or abutments securely into the framing structure using two fasteners.
Fastener Application
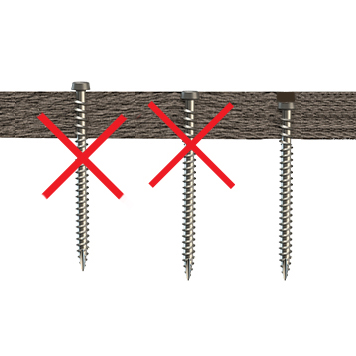
Drive fasteners perpendicular to the deck board straight into the joist. Do not install fasteners at an angle.
Spacing Between Boards
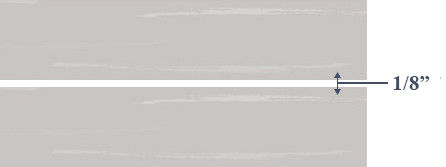
Spacing between boards should be 1/8” to 1/4”. The use of a spacer can add efficiency and help maintain proper spacing.
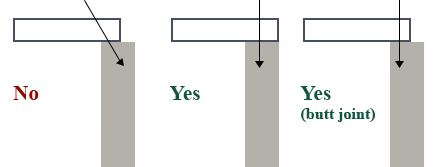
Butt Joints
For butt joints, be sure to trim cut factory ends to ensure squareness. Keep butt joints tight. Do not leave a gap at butt joints, splices or miters. Install fasteners within 1/2″ from the ends of each board.
DO NOT SCARF-CUT BUTT JOINTS
Butt joints should be tight and secure, with all edges square.
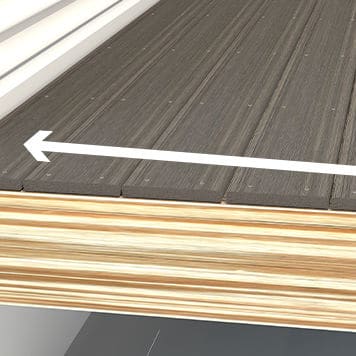
Step 3: Confirm Your Spacing & Deck Size
Your actual width will need to incorporate both the deck board width AND the spacing.
Follow along to calculate the adjusted width and spacing of your full-width deck boards.
Determine Your Deck Size
- Estimate the width of your deck.
- Confirm the width of your deck board (in this project guide, we use 5.5″ boards).
- Choose your preferred spacing based on manufacturer requirements (in this project guide, we use 1/8″ spacing).
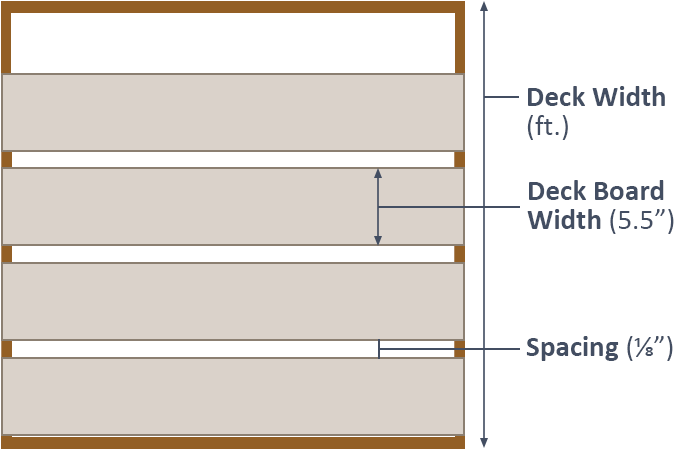
Calculate Your Deck Width
| Estimated Deck Width | ____ ft. |
| Number of Deck Boards | ____ ft. / 0.46875* |
| Actual Deck Width | ____ Deck Boards x 5.625 |
*Round up or down as necessary to arrive at an accurate estimate.
Step 4: Determine Where to Start Laying Boards
The design and size of your deck will determine the number of boards required to install TimberTech Advanced PVC decking with Cortex.
Scenario 1
Deck plan includes all full-width boards (no partial / cut / ripped down boards). You may want to start at the house and work outward for ease. See above calculation for help.
Scenario 2
Deck plan will require cutting / ripping down a board or boards. You may want to start away from the home and work inward so the off-sized board is closer to the house / hidden.
RIPPING OF BOARDS MAY BE REQUIRED
Cutting a board along its horizontal edge, or “ripping”, may be required to achieve full coverage of the framing.
Step 5: Install TimberTech Advanced PVC Decking
Best Practices For
Installing Deck Boards
- Be sure your deck boards are spaced appropriately. We recommend leaving 1/8″- 1/4″ space between boards for proper drainage.
- Drive the fasteners straight down into the deck boards.
- Install 2 screws at each joist location at 16″ on-center maximum, or consider 12″ on-center for a more rigid feel.
- Expansion/ contraction/ gapping will be most significant where extreme temperature change may exist. For best results, when possible, keep boards in shade or as cool as possible during installation.
Best Practices For
For Cortex Hidden Fastening System
- The Cortex setting tool must be used to set the Cortex screw to the proper depth.
- The Cortex fastener must be driven perpendicular to the deck surface for proper plug fit and an ideal finished look.
- The cored hole must be free of debris or moisture. Use a smooth plastic hammer head to set the Cortex plug.
- The interaction between the deck board, screw, and plug is essential.
- Do not use for fascia boards.
Check Squareness
To House & Frame
- Measure from the edge of the deck board to the outer edge of the rim joist at each end of the deck board and strike a line.
- Attach the first deck board along the line to ensure that it is straight OR strike a chalk line on top of the joists at the desired position of the first board.
- Attach the first board along the line.
To Install
The First Board
- Start by fastening the first deck board with two Cortex screws at each joist, 3/4″ from the side edges of board.
- Using the setting tool provided, drive screw at medium or high speed until it disengages at the proper level below the deck surface. Drive until the setting tool releases the screw.
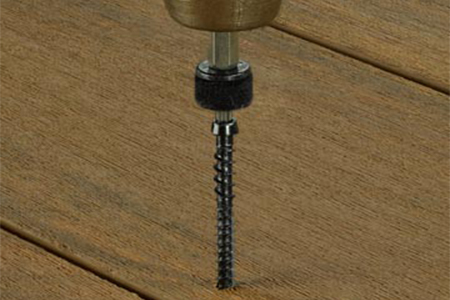
How To Install TimberTech Advanced PVC Deck Boards
With Advanced PVC Cortex Hidden Fastening System
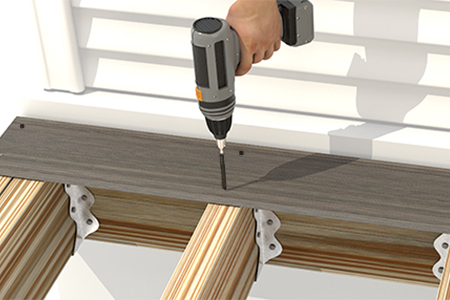
1. Place Screw
Be sure to install two screws per joist on each deck board. Remember: fasten your TimberTech Advanced PVC decking with Cortex within 1/2″ from the end.
2. Drive Screw
Drive screws straight down; do not angle into the joist. Drive to a minimum depth of 1 ¼” into solid wood framing below the bottom of the Advanced PVC deck board. This will enhance holding power and uplift resistance.
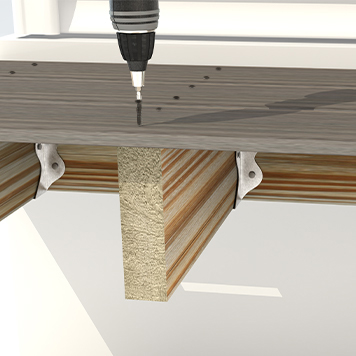
3. Confirm
Drive until the setting tool releases the screw. Setting tool and screw will automatically countersink the hole to the correct depth for adding your Cortex plug later.
DRIVE AT ONE CONTINUOUS SPEED
Do not slow down or toggle the drill trigger in a start/stop manner.
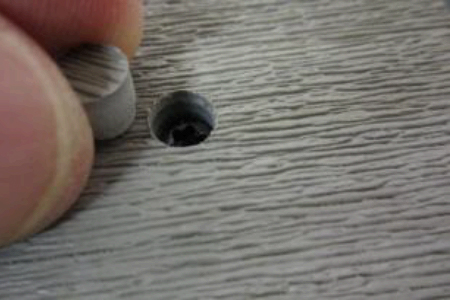
How To Install TimberTech Advanced PVC Cortex Plugs
Color-Matched Collated Plugs With Pre-Aligned Grain Pattern
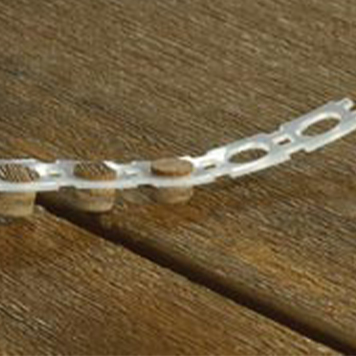
1. Place Plug
Place the first plug by hand into the recessed screw hole and release it from the plastic connector. Ensure the grain is aligned so the plug blends into the deck board.
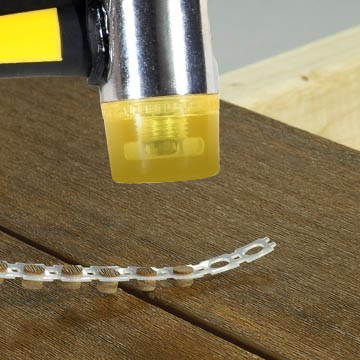
2. Tap Plug
Gently tap the plug into place using a hard plastic, smooth-face hammer. Do not tap or hammer vigorously, as this can damage the surface of the deck board.
3. Confirm
The plug should be completely flush with the surface of the deck board. Confirm that the grain pattern on the plug is consistent with that of the deck board.
DISCLAIMER
TimberTech Advanced PVC Decking & Rim Joist Covers should be installed using the same good building principals used to install wood or composite decking and in accordance with the local building codes and the Installation Guidelines included below. AZEK® Building Products accepts no liability or responsibility for the improper installation of this product. TimberTech Advanced- PVC Decking & Rim Joist Covers may not be suitable for every application and it is the sole responsibility of the installer to be sure that TimberTech AZEK Decking & Rim Joist Covers are fit for the intended use. Since all installations are unique, it is also the installer’s responsibility to determine specific requirements for each deck application. AZEK Building Products recommends that all applications be reviewed by a licensed architect, engineer, or local building official before installation. To get more information visit www.timbertech.com.
Prior to your purchase, AZEK Building Products also recommends that you review the full Installation Guidelines for more details regarding installation as well as information on care and maintenance, storage and handling, reference to warranty coverage, and other important product information. Installation Guidelines can be found at: https://www.timbertech.com/resources/installation-help/
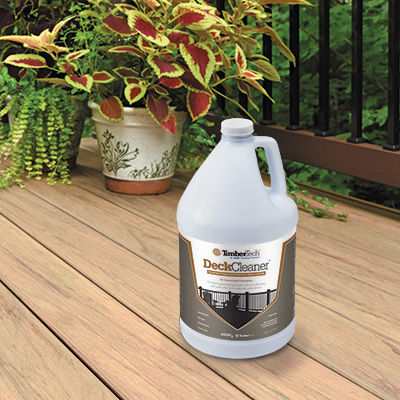
Step 6: Prolong the Aesthetics of Your Deck
While TimberTech Advanced PVC capped polymer decking is specifically engineered for enduring beauty, it’s always wise to keep your backyard build free of dirt, debris, and spills. To maximize the aesthetics of your deck, we recommend using TimberTech® DeckCleaner™.
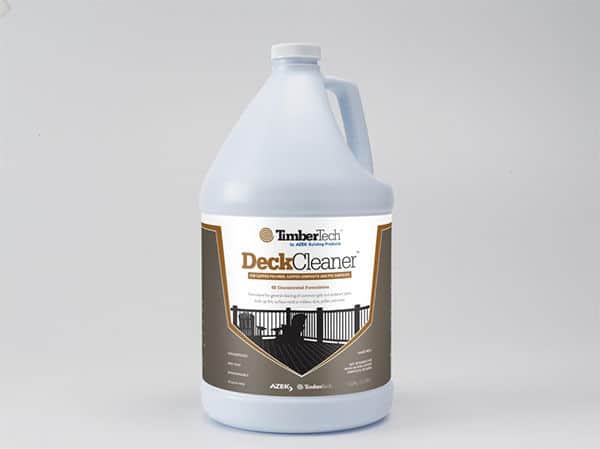
USE THE APPROPRIATE BRUSH
When cleaning your TimberTech Advanced PVC decking with DeckCleaner, use a stiff, natural-fiber brush.
For full details on keeping your capped composite deck looking as great on day 1,000 as day 1, read more over on Care & Cleaning.
Invest in Your Deck’s Beauty
Keep surface buildup at bay with TimberTech® DeckCleaner™ featuring our effective, non-toxic and bleach-free formula. Makes cleaning a breeze for small spots or entire deck surfaces.