How to Install TimberTech Composite Decking With CONCEALoc® Hidden Clip Fasteners
Our project experts take you step-by-step. When you’re ready to build, download the free project guide.
Looking for guidance on how to install TimberTech Composite decking? You’ve come to the right place.
BEFORE YOU BEGIN, make sure you’ve properly blocked and spaced your deck joists and that your deck’s substructure is healthy. Please consult all appropriate installation guides.
What To Know Before You Build
Design Details
This guide assumes the use of grooved 5.5″ deck boards and 3/16″ spacing in a straight, edge-to-edge pattern.
Railing Details
Your railing will either be installed top of the deck boards after their own installation, or you will need to trim your deck boards around the structural 4×4 posts.
TimberTech Composite Decking Installation Tips
Estimated based on a 12′ x 12′ deck; time will vary depending on the size of deck and complexity of the build.
ESTIMATED TIME: 1 Hour
RECOMMENDED MAN-POWER: 1-2 People
PREREQUISITES: Secured framing, properly attached to the house. A confirmed deck design.
OVERVIEW
Step 1: Use Best Practices for Cutting Composite Deck Boards
Step 2: Use Best Practices for Fastening Composite Deck Boards
Step 3: Use Best Practices for Fastening Composite Fascia Boards
Step 4: Determine Where to Start Laying Boards
Step 5: Install TimberTech Composite Decking
Step 6: Prolong the Aesthetics of Your Deck
Tools You’ll Need
- Safety glasses
- Power miter saw
- Jig saw
- Cordless driver
- Measuring tape
- Carpenter square
- Deck spacer or spacing tool (optional)
- Hammer
- CONCEALoc ® Fastening System
- Cortex ® , TOPLoc™, or a minimum #8 x 2-1/2″ stainless steel or other high-quality coated composite deck fasteners
Many other tools are available that can be used for installation. All tools should be used per applicable manufacturers’ instructions.
CHECK YOUR DECK
Do not move forward until you’ve confirmed your deck frame is structurally sound.
Step 1: Best Practices for Cutting Composite Deck Boards
For cutting TimberTech Composite deck boards, make sure to use an appropriate saw.
NOTE: Do not use cordless saws.
Cutting Tools

Power Miter Saw
FOR CUTTING COMPOSITE BOARDS:
Use a miter saw with a fine-toothed, carbide-tipped finish trim blade (12″ 100-tooth or 10″ 80-tooth minimum).

Jig Saw
FOR CUTTING AROUND RAIL POSTS: Use a fine-tooth blade.

Electric Circular Saw
FOR CUTTING COMPOSITE BOARDS: Use a 60-tooth fine-finish blade.
Cutting The Decking Boards
- Use proper saw and blade.
- Cut boards one at a time.
- Cut deck boards with the grain facing upward.
- While using any saw, use slow cuts or chipping can occur.
- Do not use battery-powered saws, as chipping can occur.
- As with any wood or alternative decking product, always be sure to cut the factory ends of your board for a clean and square finish.
- Make sure the face of the deck board is protected from the bottom of the saw during cutting with a circular saw or a jig saw.
- If using a circular saw, be sure to use a saw guide for clean, square cuts.
- For best results, cut boards before installing / fastening or chipping can occur.
- As always, measure twice and cut once.
Step 2: Best Practices for Fastening Composite Deck Boards
Due to the durability of TimberTech Composite deck products, a high-quality fastener is recommended. Recommended fasteners include:
- TimberTech CONCEALoc hidden clip fasteners
- TimberTech TOPLoc composite deck fasteners
- TimberTech TOPLoc fascia fastening system
- Cortex, TOPLoc, or a minimum #8 x 2-1/2″ stainless steel or other high-quality coated composite deck fasteners
For salt water coastal applications, we suggest using the above minimum fastener requirements in 316 stainless steel. As always, you should try the fastener in a sample board before using on your deck.
NOTE
TimberTech does not recommend any fastener that is not explicitly stated in the TimberTech Decking Installation Guide. Use of any alternative fastener does not void the TimberTech warranty; however, if a decking failure is caused by using one of these alternative fastening methods, any corresponding claims will be denied.
Fastening Tools

Cordless Drill

CONCEALoc Fastener Clip & Provided Fasteners

Pneumatic Gun
ANOTHER OPTION For even faster installation.
Composite Deck Fastening Best Practices
Fastener Position
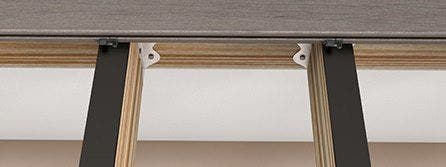
Always position fastener screw hole with the center of the joist.

Fastener Application
Drive screw at a 45 ° angle while applying pressure. The connection point of the next grooved board will be against the fasteners within the curvature of the CONCEALoc hidden fastener clip.

Spacing Between Boards
Spacing between boards should be 3/16″. The use of a spacer could add efficiency and help maintain proper spacing.
FOLLOW PROPER SPACING & GAPPING
Side-to-side board gapping must be a minimum of 1/8″ to a maximum 3/16″. Allow a 3/16″ minimum gap where the board meets any adjoining structure or post. Follow proper butt joint gapping guidelines for TimberTech Composite deck boards.
Step 3: Best Practices for Fastening Composite Fascia Boards
Due to the durability of TimberTech Composite deck products, a high-quality fastener is recommended. For best results, use:
TOPLoc fascia fastening system featuring color-matched fasteners
For salt water coastal applications, we suggest using the above minimum fastener requirements in 316 stainless steel. Avoid using flathead fasteners. Trim-head fasteners typically provide a better result. As always, you should try the fastener in a sample board before using on your deck.
Fastening Tools
Cordless Drill

TOPLoc Fascia Drill Bit
Sold separately.

TOPLoc for TimberTech
Fascia Fasteners
Step 4: Determine Where to Start Laying Boards
The design and size of your deck will determine the number of boards required to install TimberTech Composite decking.

Scenario 1
Deck plan includes all full-width boards (no partial / cut / ripped down boards). You may want to start at the house and work outward for ease.

Scenario 2
Deck plan will require cutting / ripping down a board or boards. You may want to start away from the home and work inward so the off-sized board is closer to the house / hidden.
RIPPING OF BOARDS MAY BE REQUIRED
Cutting a board along its horizontal edge, or “ripping”, may be required to achieve full coverage of the framing.
Butt Joint Gapping Requirements
Step 5: Install TimberTech Composite Decking

To Install
First and Last Grooved Board
-
Pre-drilling is required when within 1-1/2″ of the ends of the board and for temperatures below 45 °F to avoid end splitting and screw shear.
-
Pre-drill as defined below based on your selected fastener.
- Pre-drill with a 5/32″ drill bit for TOPLoc fasteners or a #8 x 2-1/2″ stainless steel or other high-quality coated composite deck screw.
- Cortex installations require a 7/32″ pre-drill at all fastener locations.
- Pre-drill through the entire depth of the board, making sure to stop at the joist.

Best Practices For
Composite Deck Board Installation
As you go, make sure:
- Each fastener is in full contact with the edge of the deck board.
- The screw is holding the fastener down tight to the joists.
- You install one fastener and one screw at each joist.

First, Place…
Your CONCEALoc Fastener
- Fully insert the CONCEALoc fastener into the grooved edge of the plank.
- Press the clip downward to engage the teeth into the top of the groove.
- Place the next board into position against the fasteners. Slightly raise the outer edge of the board being installed and slide it onto the fastener until the board contacts the spacer tab.

Best Practices For
Butt Joint Detail
- Insert the board on the right side of the splice, fully seated on a 1-1/2″ joist with one full clip designated for this side.
- Each board end at the butt-joint splice has two clips, one on each side of the board, fastened to a full 1-1/2″ joist / block.
- This means there are four clips at a butt-joint splice: two clips for the left side board, and two clips for the right side board, for a total of four.
FOR A COMPLETELY FASTENER-FREE SURFACE
Use the L-bracket or Cortex fastening system on the first and last boards.
Cortex isn’t compatible with Terrain, Prime, or Prime+ products. See the installation guide for restricted Cortex uses.
How To Lay TimberTech Composite Deck Boards

1. Insert Fastener
Insert the CONCEALoc fastener into the grooved edge of the deck board.

2. Drive Screw
Drive the screw at a 45-degree angle in the center of the joist.

3. Confirm
Drive clip until it is flush against the joist.Use exterior-grade fasteners to fasten through the outside of the joist.
How To Install TimberTech Composite Deck Boards

1. Fasten Board
Ensure fastener is in proper position.

2. Check Your Board
Place the next board into position against the fasteners. Raise the outer edge of the board being installed and slide it onto the fastener until the board contacts the spacer tab.

3. Secure Your Board
When properly installed, the inserted board should be in contact with the bent-forward spacer tab at the left end of the clip.
DO NOT USE A HAMMER
When installing your TimberTech Composite deck, do not use a hammer or damage to the edge of the board will occur. Use a beater board such as a wooden 2×4 board at least 24″ long to gently tap the TimberTech board tight to clip spacing tab if necessary. The screw will fully engage the board to the spacer tab if not already in contact.
Butt Joint Installation
Determine where butt-joint splices will be located. You may use a ‘double joist’ technique or add a ‘sister joist block’ to create a full 1-1/2″ against which each board end can rest and for proper CONCEALoc clip attachment.

First
Double up your joists at butt-joint splices.

Next
Make sure you offset the clip on the right side of the joint 1/4″ from the center line.
NOTE
The techniques shown should be used for best results. Results may vary, as expansion and contraction could still occur. AZEK Building Products Inc. claims no liability or responsibility for the improper installation of this product. Since all installations are unique, it is the sole responsibility of the installer to determine specific requirements in regard to each decking application. AZEK Building Products recommends that all designs be reviewed by a licensed architect, engineer or local building official before installation. Please contact AZEK Customer Service prior to installing if you have question or concerns.
Step 6: Prolong the Aesthetics of Your Deck
While TimberTech Composite capped composite decking is specifically engineered for enduring beauty, it’s always wise to keep your backyard build free of dirt, debris, and spills. To maximize the aesthetics of your deck, we recommend using TimberTech® DeckCleaner™.

USE THE APPROPRIATE BRUSH
When cleaning your TimberTech Composite decking with DeckCleaner, use a medium-to-stiff nylon brush.
For full details on keeping your capped composite deck looking as great on day 1,000 as day 1, read more over on Care & Cleaning.
Invest in Your Deck’s Beauty
Keep surface buildup at bay with TimberTech® DeckCleaner™ featuring our effective, non-toxic and bleach-free formula. Makes cleaning a breeze for small spots or entire deck surfaces.
